
إظهار الرسائل ذات التسميات Switching. إظهار كافة الرسائل
إظهار الرسائل ذات التسميات Switching. إظهار كافة الرسائل
Configuring Router-on-a stick InterVLAN Routing, VTP and DHCP
WOW ... can you feel it , let's jump in
I am using GNS3 network emulator
Network component
One router . c3725
Two switch's ... Yeah, I know alot have told you there is no switching capabilities in GNS3. ope there is .. and guess what it's not a router with EtherSwitch port's, nope it's called L2 - IOU . It's IOS on UNIX it will provide you not only with switching capabilities on layer 2 but also it support L3 switching capabilities , using this you will be able to do most of switching stuff, not all ! but most of/
so i am using L2 IOU switch
Note that distribution of IOU and IOS is strictly prohibited. Please don’t ask me! Google always will be your friend

First Switch 1 Configuration


First Switch 2 Configuration


Router Configuration


We are done with the switches and router lets test it but trying to assign the VPCS ip through DHCP


WoW its working and we are up
let's try some ping's from vlan10 to vlan 10 and vlan 10 to vlan 20 and vlan to gateway ping

Show it your self
you can use some show commands to verify your work
for switch
show ip interface brief | inc Vlan
show interface switchport
show interface trunkshow vlan brief
show vtp status
for router
show ip interface brief | exc down
show running-config | sec dhcp
so much fun , was it ??
try it your self replace VPCS with router with no ip routing to do telneting have fun ...
at last lets review our work
we done configuration for two switch's the vtp server switch do the vlan work and just advertise their vlan configuration to the other switch
router's interface configured as router in stick with subinterface's to match the vlan tag
then we configured two DHCP pools for both vlan's exit
Here is the code if you want to copy paste
switch 1
! Basic configuration
configure terminal
hostname cisco_switch1
enable secret cisco
line console 0
password cisco123
logging synchronous
no exec-timeout
no domain-lookup
exit
line vty 0 4
password ciscotelnet
login
exit
! configure vlan's
interface vlan10
ip address 192.168.10.2 255.255.255.0
no shutdown
exit
interface vlan20
ip address 192.168.20.2 255.255.255.0
no shutdown
exit
! Setup VTP
! vtp is mode server by defualt
vtp domain cisco
! Configure switchport interfaces
interface e0/1
switchport mode access
switchport access vlan 10
duplex full
exit
interface e0/2
switchport mode access
switchport access vlan 20
duplex full
exit
! Configure trunk inerfaces
interface e0/0
switchport trunk encapsulation dot1q
switchport mode trunk
duplex full
exit
interface e0/3
switchport trunk encapsulation dot1q
switchport mode trunk
duplex full
end
! We are done and now lets save out configuration
copy running-config startup-config
---------------------------------
switch 2
! Basic Configuration
configure terminal
hostname cisco_switch2
enable secret cisco
line console 0
password cisco123
logging synchronous
no exec-timeout
no domain-lookup
exit
line vty 0 4
password ciscotelnet
login
exit
! Set up VTP
! here we will set vtp mode to client
vtp domain cisco
vtp mode client
! Configure switchport interfaces
interface e0/1
switchport mode access
switchport access vlan 10
duplex full
exit
interface e0/2
switchport mode access
switchport access vlan 20
duplex full
exit
! Configure Trunk interfaces
interface e0/0
switchport trunk encapsulation dot1q
switchport mode trunk
duplex full
end
! We are done and now lets save out configuration
copy running-config startup-config
---------------------------------------------------------------------------------------------
Router
! Basic Configuration
configure terminal
hostname cisco_router
enable secret cisco
line console 0
password cisco123
logging synchronous
no exec-timeout
no domain-lookup
exit
line vty 0 4
password ciscotelnet
login
exit
! Configure Router subinterfaces
interface fastEthernet 0/0
no shutdown
exit
int fa0/0.10
encapsulation dot1Q 10
ip address 192.168.10.1 255.255.255.0
exit
interface fastEthernet 0/0.20
encapsulation dot1Q 20
ip address 192.168.20.1 255.255.255.0
exit
! Configure DHCP setting
ip dhcp excluded-address 192.168.10.1 192.168.10.10
ip dhcp excluded-address 192.168.20.1 192.168.20.10
ip dhcp pool vlan10
network 192.168.10.0 /24
default-router 192.168.10.1
dns-server 8.8.8.8
exit
ip dhcp pool vlan20
network 192.168.20.0 /24
default-router 192.168.20.1
dns-server 8.8.8.8
end
! We are done and now lets save out configuration
copy running-config startup-config
-----------------------------------------------
wish it was fun
At the end I wish I have delivered good information to you and i would thank you for reading this article
Cisco Switch Basic Configuration using CLI
Hi guys this is a wonderful information I want to share with you and I am so exited to do this with you, basic configuration to Cisco switch this is awesome and we will enjoy it
First you should know that cisco run its own operating system on it's devices and it is called IOS interwork operating system and it is command line based using command line interface CLI you can access and program any cisco device, to access to the switch there are several methods, directly using console port by console cable or auxiliary port by connecting dial-up modem to it. Or remotely by using telnet and ssh.
here we will be using console port to connect to clean switch ( no configuration)
so you need to do some steps to connect to your switch's console port
Step 1 to connect to the switch console port you will need your laptop and a roll over cable and USB to Serial adapter connect them together and you are done with step 1
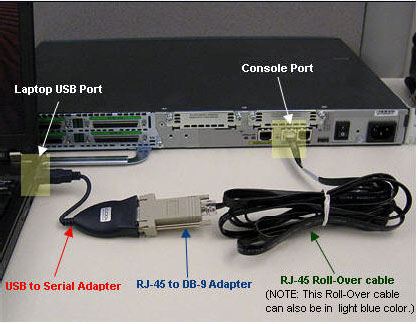
Step 2 use terminal emulator program to communicate through console port
Actually there is some popular terminal emulators out there, you will find free one's and paid one's and all work such great for you to do your job
Free emulators
Putty
Teraterm
Paid emulators
HyperACCESS
SecureCRT
Step 3 get the com port of your usb adapter To connect to your USB-to-Serial converter using Putty, you must identify which port is allocated to your converter. To do this in Windows 7 , Go to Start -> Right Click Computer -> Manage . Then Computer Management (Local) -> Device Manager -> Ports (COM & LPT) -> Prolifec USB-to-Serial Comm Port (COM3) . You should see your device listing similar to the image below , add the COM3 port to putty check the serial option click open and you are ready to fire it up

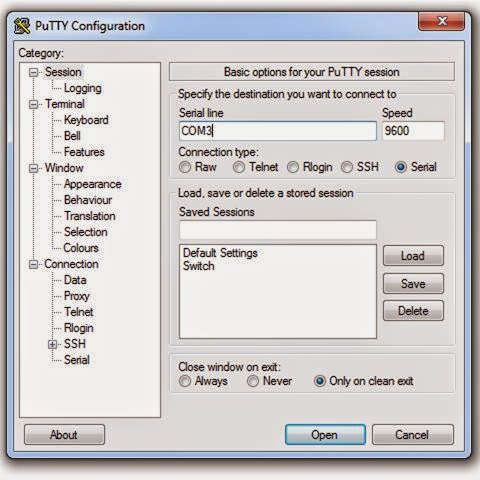
Now you are connected to your switch, first switch will be in boot process if no startup configuration file stored in the NVRAM IOS will ask you to enter initial configuration dialog .. just type no, then it will prompt your the the user exec mode

So this will take us to talk about the basic CLI command modes
User EXEC mode : temporarily change terminal settings, perform basic tests, and list system information
Privileged mode : privileged commands configure operating parameters and used for show comands
Global configuration mode : Global configuration commands apply to features that affect the device as a whole
To go from user EXEC mode to privileged mode we use command enable and to go from privileged mode to global configuration mode we use configuration terminal (conf t) command
At the global configuration mode we will configure our switch
Our basic configuration will include
- setting hostname
- learn negating command
- setting password to privileged mode
access to line configuration for console setting
- password for user EXEC mode
- make writing commands no interrupted by syslog message
- disable time out for the switch
access to virtual line configuration to set up telnet
- set telnet password
- enable telnet login
- enable vlan1
- set vlan 1 ip address


No lets verify what we done
- verify secret password by re entering the privileged mode
- ping vlan1
- telnet vlan
- show running configuration for vlan1
- finally save the running to startup configuration

here is written commands for what i did here
enable
configure terminal
hostname cisco_switich
enable password cisco1
enable secret ciscosecret
line console 0
password cisco123
logging synchronous
no exec-timeout
exit
line vty 0 4
password ciscotelnet
login
exit
interface vlan1
no shutdown
ip address 192.168.1.2 255.255.255.0
end
exit
exit
enable
ping 192.168.1.2
telnet 192.168.1.2
exit
sh running-config int vlan1
copy running-config startup-config
At the end I wish I have delivered good information to you and i would thank you for reading this article
الاشتراك في:
الرسائل
(
Atom
)


